Joined
May 29, 2009
Messages
102
Reaction score
47
Location
Grantham
Trophy No.
473
First off this isnt my first post as im a user from the old forum but ive had to sign up again as admin are not gettin back to me about reactivating my old user name ( If someone could look into it that would be great, my old user name is nathanh)

Anyhow, my suspension has needed rebuilding for some time as ive been running around on cup shocks for a while.
I wasnt really happy paying over £400 to have them done so decided to do it myself.

Removed the reservoir and made a tool to remove the top cap, removed the shaft and inner tube.

2013-05-28125701_zps3e9883a5.jpg

2013-05-29165620_zps09f92660.jpg

Photo of the guide bush and scraper seal (note the complete lack of an external dust seal)

2013-05-29165813_zps6487e3f9.jpg

Stripped apart, both the guide bush and scraper seal were scored luckly the shaft wasnt!

2013-05-29171810_zpsb820b4d5.jpg

Unfortunatly I had to drill the adjuster knob off to remove it/de pin.

2013-05-31110234_zpsea53b00c.jpg

Upon removing the other adjuster is was so badly corroded it took the top of the shaft with it... Great... So I machined a pair of replacements from stainless (pictured is the original shaft from the other side). I also took this opportunity to replace the crap mild steel spring plunger with some stainless jobbies. I drilled the oeiginal holes out to accommodate an enclosed cup design.
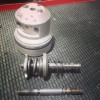
IMG_20140113_120546_zps721072a6.jpg

I then blasted the bodies, etched and painted. Had the ally bits cleaned and re anodised.

2013-06-18144036_zps99eb1415.jpg

Made some new adjusters (made an extra 3 pairs if anyones interested) had them anodised red like the originals.
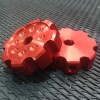
IMG_20140319_194019_zps88acae9b.jpg

2014-03-19113756_zps376d9028.jpg

Im at the point where im ready to rebuild them now but the guide bush and scraper seal are not off the shelf items so need to do some more digging or modify the cap to take off the shelf parts.

Would be rude not to get a pair of these too!

2014-03-18234712_zpse31bf730.jpg

Nathan
 
Joined
Jul 27, 2006
Messages
6,212
Reaction score
816
Location
OXFORD
Trophy No.
307
That is fantastic work, I would be very interested in at least a pair of the adjusters please. Let me know what you want for them and I can sort asap.
 
Joined
May 29, 2009
Messages
102
Reaction score
47
Location
Grantham
Trophy No.
473
Thanks, the adjusters are designed around the new index plungers so you would need to drill and countersink both holes (and remove the mild steel washer that goes over the shaft) if you kept the original spring and ball they would have a degree of rotation when 'clicked' in place. I could make up an 'adjuster upgrade' kit with all the parts and some instructions etc. Probably be about £40 all in.
 
Joined
May 29, 2009
Messages
102
Reaction score
47
Location
Grantham
Trophy No.
473
I thought about that but its down to getting hold of standard parts... Which is proving hard work. Ive also made a plastic plate with a dust seal thats pressed into it. It sits under the black cap as a primary dust seal in the effort to make them more road friendly. To be honest if they had a decent dust seal theres nothing stopping them from having to be rebuilt. The only reason they would leak would be due to dirt ingress!
At the end of the day they are motorsport derived with no real need for protection against dust and dirt ingress, as they would more than likely be rebuilt or revavled before each event.
Im not happy with the design of the plate as the only thing holding it in place is the cap which is only a press fit on the damper body. I need to fix it to the top cap or design a new top cap with an integrated dust seal after the bush... But where do I stop lol.
 
Joined
Feb 16, 2008
Messages
406
Reaction score
6
Nice work. Just to add the R1 Twingo Motorsport version of the Sachs dampers (77 111 67 414/77 111 67 413) that were used to replace mine come with machined dust seals which are bolted to the top of the dampers and forms a tight seal.

13366945054_2c2297a249.jpg
13366750793_e5a00201d3.jpg
 
Last edited:

MarcB

ClioTrophy Club Member
Joined
Nov 26, 2010
Messages
1,578
Reaction score
412
Location
Uk
Nathan can i ask what it is you do and would you consider refurbishing sachs dampers.
Looking at the information and pictures you have posted scare me as there is no way i would take my spare set apart.

As said before speak to simon at cornering force regarding the red adjusters.
 
Joined
May 29, 2009
Messages
102
Reaction score
47
Location
Grantham
Trophy No.
473
Im a service engineer for a company who make machinery for the sandwich industry... I was a used car salesman before that. I thought about doing it but I cant get hold of replacement shafts if people needed them.
 

MarcB

ClioTrophy Club Member
Joined
Nov 26, 2010
Messages
1,578
Reaction score
412
Location
Uk
NathanH can you PM me with a rough cost of doing this ?

How do you re-gas them ?
 
Joined
May 29, 2009
Messages
102
Reaction score
47
Location
Grantham
Trophy No.
473
It's been a while but I forgot to take some assembly photos as I was too excited about getting them together. Only got one together as I was 2 o-rings short on the second damper so couldn't finish it.

image1_zpssyfweq85.jpg
 
Last edited:
Joined
May 29, 2009
Messages
102
Reaction score
47
Location
Grantham
Trophy No.
473
Not really, its taken a while to source the right parts. After hours of internet searching and emails to bearing and seal suppliers I ended up having the piston scraper seal custom made for £6 each. Cornering Force were great as they were prepared to sell me the seals for £14 each but I couldn't justify £28 for 2 rubber seals. The components are nothing special at the end of the day. With regards to the rod guide bush, I couldn't find it anywhere! its a strange size (25x27x11.5) as it only has a 1mm wall thickness.
Had to go a bit drastic with this one... I machined the hole out from 27mm to 28mm and fitted an off the shelf bushing (25x28x12) for £1.90.
All the other o-rings are off the shelf parts and cost about £12 with p&p and min order charges. Assembly is just the reverse of taking it apart.
Filling with oil is the critical part as you need to minimize the amount of bubbles etc in the oil. I have no idea about the right process of filling them but just looked at it logically and did this;

De-gas the oil under vacuum to draw any gas out. (I have a vac pump and vessel)

Fasten the compression adjuster to the body and fit the reservoir body.

Gently fill the main body and tube with oil to about 70% full, then insert the piston and rod assembly and cycle the piston slowly to fill the valve and release and trapped air from under the piston.

Gently fill the main body and tube to the top and screw on the top cap until the seal is seated but the cap is still loose (some oil spills from the top and some seeps from the reservoir).

Invert the damper and fill the reservoir 90%, push the sliding piston into the reservoir until the seal on the piston is made so no oil is leaking out. Make sure the compression is at its softest setting and the rod is fully inserted into the body before doing this.

Still holding the reservoir piston, invert the damper again and loosen the top cap until the seal is only just broken. Push the reservoir piston in until it is seated half way up the reservoir (I cant remember the measurement but make sure its the same on both dampers) a lot of oil will be displaced from the top cap. Tighten the top cap fully.

Insert the reservoir bottom cap and retaining clip.

Now ideally a vacuum should be pulled on the reservoir and then filled with Nitrogen... but I didn't have any so I just pressurized the reservoir with 65 psi. 65 psi is an educated guess, I used to fill my MX bike with 140 psi but the shock on that is a lot more prone to cavitation than the damper on a road car. Ill see how it goes.

I can't match the dampers as I don't have a test rig so ill have to come up with another way of matching the 'clicks'.

If anyone has any suggestions or ways I could have done this differently I'm open to suggestion. I'm not a suspension expert at the end of the day but this also isn't a race car.

:)
 
Joined
Feb 18, 2013
Messages
2,414
Reaction score
169
Location
Nr Stratford on Avon
You could cause problems using air, as it contains moisture and can rot them from the insied out, and nitrogen does not react to heat like air will and expand
 
Last edited:
Joined
Dec 11, 2015
Messages
46
Reaction score
0
Location
Bracknell, Berkshire
great post,
would be interested in doing this myself to save a small fortune, also be handy to get a pair of dust covers fitted in the process. any info would be a great help.
 
Top