You are using an out of date browser. It may not display this or other websites correctly.
You should upgrade or use an alternative browser.
You should upgrade or use an alternative browser.
Rust Proofing and Protection - Your Experiences
- Thread starter will2705
- Start date
- Thread starter
- #22
Apologies for the delay in responding. The reason for the delay is that I've actually been rather busy with #162. On speaking with the local specialist further it seemed (disappointingly), that there was not going to perform any kind of protection on the "suspension". Now, I wouldn't expect them "have at" the rear dampers and springs, etc. but what they were actually referring to was the stub axle carrier/mounting plate, so definitely still part of the axle. This essentially meant that I would have been paying for them to clean and treat the bits they could see and inject the cavity wax.
It was at this point that they admitted they were concerned that the intended work wasn't going to meet my expectations - If I'm honest I agreed so we decided not to proceed.
So, what next? I was delighted with the Bilthamber product(s) (i got to see some other vehicles with it applied) and speak to Pete Hamber and following our conversation(s) I was sure it was the right product to be using, I just couldn't find anyone to apply it locally and before winter set it. Note, I did find another "very reputable" applicator, but they have a six-month, yes month waiting list, I think they need a bigger workshop!
Where do I stand now? Well, since my last post I've decided to strip the entire underside of the car to ensure it really gets the right protection. To justify the expense (get ready for some serious man maths here), I calculated I could do the car in two halves (starting with the rear) and each half would cost around £600ish and would also be able to do the following improvements:
Needless to say, I've already completely blown the budget by replacing loads of parts that don't really have to be replaced, but I thought I may as well take the opportunity. Luckily (for me) my brother (@ollie2705) is currently on furlough and now has the time to assist me (read: do most of the work!) in completing this. He has completed similar work on his Fiat Coupe and has rebuilt a Land Rover Series 2A.
The good news is that work is progressing well and I luckily have some dry storage. #162 has now had the entire rear end stripped and the underside fully cleaned. It's' now drying off for a week to make sure it's absolutely bone dry. In the meantime, I am waiting for new parts (all genuine mostly from RPD) but I've also decided to upgrade things like the exhaust clamps for stainless items.
The Axle should be back from the blasters this week, along with the exhaust mounting brackets and various other bits. As others have commented, It turns out that there was very little rust, I would agree that these have held up very well.
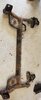
The next steps are to attack any bits of minor surface rust on the underside with BH Hydrate 80, respray with stone chip (looking for product recommendations here, please?), and seal it with the BH Dynax UC before doing the same to the other components and using SS50 for the cavities. I've also taken the opportunity to clean and polish everything while I have easy access, see a picture of the exhaust attached.")
It was at this point that they admitted they were concerned that the intended work wasn't going to meet my expectations - If I'm honest I agreed so we decided not to proceed.
So, what next? I was delighted with the Bilthamber product(s) (i got to see some other vehicles with it applied) and speak to Pete Hamber and following our conversation(s) I was sure it was the right product to be using, I just couldn't find anyone to apply it locally and before winter set it. Note, I did find another "very reputable" applicator, but they have a six-month, yes month waiting list, I think they need a bigger workshop!
Where do I stand now? Well, since my last post I've decided to strip the entire underside of the car to ensure it really gets the right protection. To justify the expense (get ready for some serious man maths here), I calculated I could do the car in two halves (starting with the rear) and each half would cost around £600ish and would also be able to do the following improvements:
- Full nut and bolt replacement, for A4 stainless steel where possible and used high-tensile or stretch bolts where required.
- Replacement of all rubbers and bushes and a full brake rebuild with Godspeed J hooks on the front and new OEM for the rears
- Remove the rear axle and have it fully media blasted and powder coated - this has allowed me to use the UC Bilthamber product for a clear finish
- Ensure that it isn't just the surface at the bottom of the car (and also exposed to the road), but ensure each component can have all surfaces treated hopefully providing better all-round protection; this also meant that by dropping the axle access could be gained to parts that touch "metal on metal"
Needless to say, I've already completely blown the budget by replacing loads of parts that don't really have to be replaced, but I thought I may as well take the opportunity. Luckily (for me) my brother (@ollie2705) is currently on furlough and now has the time to assist me (read: do most of the work!) in completing this. He has completed similar work on his Fiat Coupe and has rebuilt a Land Rover Series 2A.
The good news is that work is progressing well and I luckily have some dry storage. #162 has now had the entire rear end stripped and the underside fully cleaned. It's' now drying off for a week to make sure it's absolutely bone dry. In the meantime, I am waiting for new parts (all genuine mostly from RPD) but I've also decided to upgrade things like the exhaust clamps for stainless items.
The Axle should be back from the blasters this week, along with the exhaust mounting brackets and various other bits. As others have commented, It turns out that there was very little rust, I would agree that these have held up very well.
The next steps are to attack any bits of minor surface rust on the underside with BH Hydrate 80, respray with stone chip (looking for product recommendations here, please?), and seal it with the BH Dynax UC before doing the same to the other components and using SS50 for the cavities. I've also taken the opportunity to clean and polish everything while I have easy access, see a picture of the exhaust attached.
Attachments
- Thread starter
- #23
The next steps are to attack any bits of minor surface rust on the underside with BH Hydrate 80, respray withstone chip (looking for product recommendations here, please?), and seal it with the BH Dynax UC before doing the same to the other components and using SS50 for the cavities.
I actually decided to go with BH Epoxy Mastic for underside protection rather than plain paint/stone chip
Last edited:
hoolio
ClioTrophy Club Member
Apologies for the delay in responding. The reason for the delay is that I've actually been rather busy with #162. On speaking with the local specialist further it seemed (disappointingly), that there was not going to perform any kind of protection on the "suspension". Now, I wouldn't expect them "have at" the rear dampers and springs, etc. but what they were actually referring to was the stub axle carrier/mounting plate, so definitely still part of the axle. This essentially meant that I would have been paying for them to clean and treat the bits they could see and inject the cavity wax.
It was at this point that they admitted they were concerned that the intended work wasn't going to meet my expectations - If I'm honest I agreed so we decided not to proceed.
So, what next? I was delighted with the Bilthamber product(s) (i got to see some other vehicles with it applied) and speak to Pete Hamber and following our conversation(s) I was sure it was the right product to be using, I just couldn't find anyone to apply it locally and before winter set it. Note, I did find another "very reputable" applicator, but they have a six-month, yes month waiting list, I think they need a bigger workshop!
Where do I stand now? Well, since my last post I've decided to strip the entire underside of the car to ensure it really gets the right protection. To justify the expense (get ready for some serious man maths here), I calculated I could do the car in two halves (starting with the rear) and each half would cost around £600ish and would also be able to do the following improvements:
- Full nut and bolt replacement, for A4 stainless steel where possible and used high-tensile or stretch bolts where required.
- Replacement of all rubbers and bushes and a full brake rebuild with Godspeed J hooks on the front and new OEM for the rears
- Remove the rear axle and have it fully media blasted and powder coated - this has allowed me to use the UC Bilthamber product for a clear finish
- Ensure that it isn't just the surface at the bottom of the car (and also exposed to the road), but ensure each component can have all surfaces treated hopefully providing better all-round protection; this also meant that by dropping the axle access could be gained to parts that touch "metal on metal"
Needless to say, I've already completely blown the budget by replacing loads of parts that don't really have to be replaced, but I thought I may as well take the opportunity. Luckily (for me) my brother (@ollie2705) is currently on furlough and now has the time to assist me (read: do most of the work!) in completing this. He has completed similar work on his Fiat Coupe and has rebuilt a Land Rover Series 2A.
The good news is that work is progressing well and I luckily have some dry storage. #162 has now had the entire rear end stripped and the underside fully cleaned. It's' now drying off for a week to make sure it's absolutely bone dry. In the meantime, I am waiting for new parts (all genuine mostly from RPD) but I've also decided to upgrade things like the exhaust clamps for stainless items.
The Axle should be back from the blasters this week, along with the exhaust mounting brackets and various other bits. As others have commented, It turns out that there was very little rust, I would agree that these have held up very well.
The next steps are to attack any bits of minor surface rust on the underside with BH Hydrate 80, respray with stone chip (looking for product recommendations here, please?), and seal it with the BH Dynax UC before doing the same to the other components and using SS50 for the cavities. I've also taken the opportunity to clean and polish everything while I have easy access, see a picture of the exhaust attached.
It’s possibly too late but it would be really useful to see any pictures of the work progress? Also when you say “entire rear end stripped and underside fully cleaned“ do you mean you have stripped off the underseal?
- Thread starter
- #25
It’s possibly too late but it would be really useful to see any pictures of the work progress? Also when you say “entire rear end stripped and underside fully cleaned“ do you mean you have stripped off the underseal?
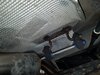
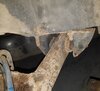
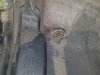
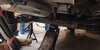
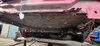
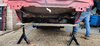
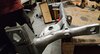
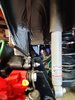
I did take a few pictures, this should hopefully show you the amount of dirt that's built up over time. In my opinion, without removing all the rear suspension components I don't think you would have really got all the dirt and grime away. There are some pictures taken outside showing pre and post the first clean, but since then I've had the fuel tank out and given the whole underside another good cleaning.
I've also included a few pictures of my rear axle, it looks fairly rusty but it was really only surface contamination, as with the exhaust hangers. I think it came up well after having it blasted.
You should also be able to see a few of the light rust spots that will need treatment, contact patches on the underside of the car, in between the rear axle carrier and the body.
Overall I don't think the rust is too bad, but my T has only done 58k.
Attachments
-
 20201027_133942.jpg1 MB · Views: 55
 -
 20201027_133958.jpg807.5 KB · Views: 53
 -
 20201027_134005.jpg1.3 MB · Views: 51
 -
 20201030_123707.jpg327.2 KB · Views: 50
 -
 IMG_20201027_140746.jpg735.8 KB · Views: 50
 -
 IMG_20201027_140803.jpg1.1 MB · Views: 52
 -
 IMG_20201112_120330.jpg805 KB · Views: 53
 -
 IMG_20201112_120339.jpg325.5 KB · Views: 51
 -
 IMG_20201112_120552.jpg1.2 MB · Views: 52
 -
 IMG_20201112_123445.jpg493.9 KB · Views: 51
- Thread starter
- #26
hoolio
ClioTrophy Club Member
Thanks Will, mine has similar mileage so interesting to see another’s underwear! Mine seems to be mostly dirty but could probably do with dismantling to give it the same treatment.
It sounds like you’ve got it under control and have some useful assistance, if you’re minds ticking at night watch road & race on his 350z who breaks his refresh down. Will be starting on mine in winter 52k atm so ? it’s like yours