Rear Suspension Rebuild

BenG

ClioTrophy Moderator
Joined
Feb 19, 2008
Messages
2,215
Reaction score
512
Location
Cumbria
Trophy No.
266
For 4 months my Trophy's been sat on the ramp looking sorry for itself. A bit of light maintenance has ended up being a full overhaul of the suspension and brake system. Thankfully, I'm not too far away from being finished now, I've just got the rear to do. This is what it looked like before....

IMG_1365.JPG

IMG_1363.JPG

IMG_1364.JPG

At first I was just going to fit some new brakes, springs and dampers but as I was stripping it down i noticed it was looking a bit shabby in other places and would benefit from some additional work. The rear axle beam was particularly rusty as well as the supporting bracket so I ended up removing it and sending it off for blasting and powder coating. I've just picked it up today, it looks pretty sweet.

FullSizeRender 36.jpg

FullSizeRender 18.jpg

FullSizeRender 22.jpg

The rear beam isn't that difficult to remove, it's secured only by 2 bolts which fit through the bushes. It does involve disconnecting the brake hose fittings where they attach to the beam, they need to be plugged straight away to stop the fluid from leaking. The fuel tank also has to be lowered in order to remove the right hand side axle beam mounting bolt. Then it pretty much comes off, it's surprisingly heavy.
You can get away from having to lower the fuel tank if you remove the supporting bracket which the beam attaches too. I wouldn't recommend this as the nuts don't come off easily, one of mine got stuck and I have no choice to cut it off and fit a new one. The part number for the new bolt is 7703015200. (Picture below of the bolt).

FullSizeRender 2.jpg

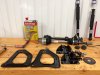
There's a few other brackets underneath which need removing and painting..

Brake pipe bracket.

FullSizeRender 11.jpg

Axle beam supporting bracket..

IMG_1441.JPG

Exhaust hanger..

IMG_1447.JPG
 

BenG

ClioTrophy Moderator
Joined
Feb 19, 2008
Messages
2,215
Reaction score
512
Location
Cumbria
Trophy No.
266
Stub axle.

IMG_1440.JPG

Rear hubs.

FullSizeRender 19.jpg

Once I've got these bits painted I can start putting it all back together with some nice and shiny new bits...

IMG_1443.JPG

IMG_1445.JPG

IMG_1451.JPG

IMG_1446.JPG

IMG_1444.JPG

FullSizeRender 3.jpg

FullSizeRender 24.jpg
 

BenG

ClioTrophy Moderator
Joined
Feb 19, 2008
Messages
2,215
Reaction score
512
Location
Cumbria
Trophy No.
266
Overall it's not looking too bad underneath...

FullSizeRender 14.jpg

The only thing that's concerning me are these 2 patches of surface rust on the bodywork underneath...

FullSizeRender 28.jpg

FullSizeRender 38.jpg

Does anyone have any ideas on the best way to deal with these?
 

Big Dave

ClioTrophy Club Member
Joined
Jan 4, 2012
Messages
634
Reaction score
393
Location
Blackpool
Trophy No.
283
A man after my own heart.
This will be a winter project for me, as mine is looking very much like yours...
Its currently in the middle of a front end refresh...
Nice shiny new bits....:grinning::grinning::grinning:
 

BenG

ClioTrophy Moderator
Joined
Feb 19, 2008
Messages
2,215
Reaction score
512
Location
Cumbria
Trophy No.
266
I might still be on with it by winter at this rate Dave. Hope your rebuild is going well?

I guess I'm one step ahead as I've already done the front, although I have to return to it to fit new driveshafts. I'm thinking I might have the front ARB and subframe powder coated. It's not really necessary but I think it will finish the front off nicely.

FullSizeRender 8.jpg

IMG_0940.JPG

FullSizeRender 9.jpg

FullSizeRender.jpg

FullSizeRender 13.jpg

FullSizeRender 4.jpg
 
Last edited:
Joined
Jul 27, 2006
Messages
6,144
Reaction score
695
Location
OXFORD
Trophy No.
307
Bagsy next on the lift, mine needs all all of this and more. It'll feel like new when finished Ben.
 

BenG

ClioTrophy Moderator
Joined
Feb 19, 2008
Messages
2,215
Reaction score
512
Location
Cumbria
Trophy No.
266
Hope so J, I can't wait to drive it now.
 

Big Dave

ClioTrophy Club Member
Joined
Jan 4, 2012
Messages
634
Reaction score
393
Location
Blackpool
Trophy No.
283
Yes to the front arb, the ends look a bit crusty,,,,,, not sure if ide go all the way and do the front subframe....
 

BenG

ClioTrophy Moderator
Joined
Feb 19, 2008
Messages
2,215
Reaction score
512
Location
Cumbria
Trophy No.
266
I'll definitely get that done. It would be typical if it failed its next MOT on something like a worn ARB or bush after everything I've done recently.

So far it's never failed an MOT and I've had 3 advisories..

- Brake pad wearing thin.
- Noisy exhaust. (Yozzasport)
- No rear seats fitted at time of test.

I'm actually quite proud of that, which is probably a bit sad. Pressure's on now to keep it that way.
 
Joined
Jan 19, 2014
Messages
1,514
Reaction score
460
Location
Warrington...leaving the club
As ever the jealousy factor of your "shed" is high Ben .

At least the trophy doesn't have headlight washers to blind side you at an mot. I had to do them pre mot on my first 182. £15 part...utter pig of a job.
 

Big Dave

ClioTrophy Club Member
Joined
Jan 4, 2012
Messages
634
Reaction score
393
Location
Blackpool
Trophy No.
283
Ben.
You mentioned about removing the rear axle mounts, are the bolt heads captive in the body, or did you have to get a socket on them from above.??
Are they easy to both get to and or replace if needed.?
They don't look too hard to remove, its just the threads on mine are a bit crusty, although since I bought the car, most accessable bolts have been coated in spray grease...
Also where from and how much were your new rear brake callipers.??
I might be in the market for a pair of them, as my handbrake has always been weak, and is a pain to adjust correctly...[Unless im doing something wrong]....Or maybe it might be my handbrake cables that are odd, as ive heard that they can be variations in length of cable..
PS,,, I too am working on a 4 post ramp.... So its easy to access most things...
Cheers....
 

BenG

ClioTrophy Moderator
Joined
Feb 19, 2008
Messages
2,215
Reaction score
512
Location
Cumbria
Trophy No.
266
They're captive in the body by the means of a metal clip which fits around the head of the bolt. As you can see from the pictures the head is round so you can't really use anything to hold it, once the clip fails to hold it it's game over.


IMG_1464.JPG

They're easy enough to get to, they're just located under the rear seat.

IMG_1465.JPG

I bought my calipers from Mikey on here a while back.
 

BenG

ClioTrophy Moderator
Joined
Feb 19, 2008
Messages
2,215
Reaction score
512
Location
Cumbria
Trophy No.
266
Hubs and stub axle painted. New bolts fitted.

IMG_1460.JPG

New discs..

IMG_1462.JPG

Sent the front ARB off for powder coating, along with these subframe support bracket things that I don't know the name of? Also sent the rear beam mounting bracket.

IMG_1468.JPG

IMG_1470.JPG

IMG_1472.JPG

IMG_1473.JPG
 
Joined
Dec 23, 2012
Messages
58
Reaction score
27
All I would say with the bolts through the floor, soak them on the underside with plenty of penetrating fluid maybe the day before.
Then, from experience, do not use any form of buzz or impact gun, they will destroy the small metal clip that hold them secure on the top side, it's just too much power and the clips have no chance.
I know it's a much slower process but just undo them with a ratchet and socket at a steady pace.

Using a buzz gun I always loose to the bolts/clips, when using a ratchet I've always won.
 

BenG

ClioTrophy Moderator
Joined
Feb 19, 2008
Messages
2,215
Reaction score
512
Location
Cumbria
Trophy No.
266
Good advice. That's what I did, I pre soaked the bolts the night before and used a ratchet and socket, 5 of the nuts came off fairly easily, although they were quite tight, only 1 got stuck. Luckily it had been wound down a few threads before it got stuck, it left just enough room to cut it off with a dremel/cutting disc.

Pick up the items above from the powder coaters. They had the oven on and were prepping some other work when I showed up so it ended up being a quick turn around. ARB will be ready tomorrow..

IMG_1475.JPG

Painted exhaust hanger myself..

IMG_1483.JPG

Rear ARB bracket with new fittings. Not the best job but it will do..

IMG_1489.JPG

Rear Damper cover thing..

IMG_1482.JPG

All the bits are ready now so it can all be put back together. Started building it back up, it weighs an f-in tonne!

IMG_1488.JPG

IMG_1478.JPG

IMG_1484.JPG

FullSizeRender.jpg

Good as new :grinning:
 

Attachments

  • IMG_1481.JPG
    IMG_1481.JPG
    1,000.3 KB · Views: 19

Big Dave

ClioTrophy Club Member
Joined
Jan 4, 2012
Messages
634
Reaction score
393
Location
Blackpool
Trophy No.
283
OOooo eeeerrr. Nice shiny new bits...:sunglasses::sunglasses:
Itl be better than new ....

Im interested to know how youl find the powerflexed rear beam, over the standard bushes...

My car when I bought it had all the front bushes replaced with the purple powerflex jobs, and I always thought it felt nicely focused , but the rear a tad "floaty", but then again, im used to RWD.
 

BenG

ClioTrophy Moderator
Joined
Feb 19, 2008
Messages
2,215
Reaction score
512
Location
Cumbria
Trophy No.
266
That reminds me... The rear beam bush was a right pain to remove, it was stuck solid. I ended up searching CS for tips and was informed to drill out the old rubber, cut through the outer steel ring with a hacksaw and then bend the steel ring inwards with a hammer and screwdriver. It took me an hour or more to drill out all the rubber and I snapped 2 drill bits doing it. After finally removing it I took a different approach with the second one. I simply just hit the steel ring with a chisel to bend it inwards, it just tapped out, took me 2 minutes.

Can't believe I messed about drilling out the rubber.
 
Joined
May 21, 2014
Messages
324
Reaction score
127
Location
Carnoustie
Trophy No.
125
Awkward jobs like that are always infinitely quicker the second time round and you're always left wondering, if only...
 
Joined
Jan 19, 2014
Messages
1,514
Reaction score
460
Location
Warrington...leaving the club
yeah, curious on peoples thoughts of dropping the subframe.

option 1 is detach the rack from the column and power steering hoses. The factory photos show the rack was attached to the subframe out of the car when built so this is technically the reverse
option 2 is detach the rack from the subframe. and leave tide up in situ.

I did option 2 last time on and it was a fecking pig to get at the bolts holding the rack on.... however is this easier than option 1?
 
Top